
Does cold and frozen soil stop you from exercising your green thumb over the winter? Consider making a mini greenhouse using a plastic bottle. It’ll trap in moisture and heat, providing a warm, humid environment for your plants to grow. If you start seeds in February, depending on the types of plants, they should be ready to transplant in spring.
To make your mini greenhouse, you’ll need:
- A rinsed clear or translucent plastic bottle, such as a milk jug or 2-liter soda bottle.
- Scissors or a sharp utility knife.
- Potting soil.
- Seeds.
- Water.
- Duct tape.
- A marker (optional).
- A drill (optional).

Instructions:
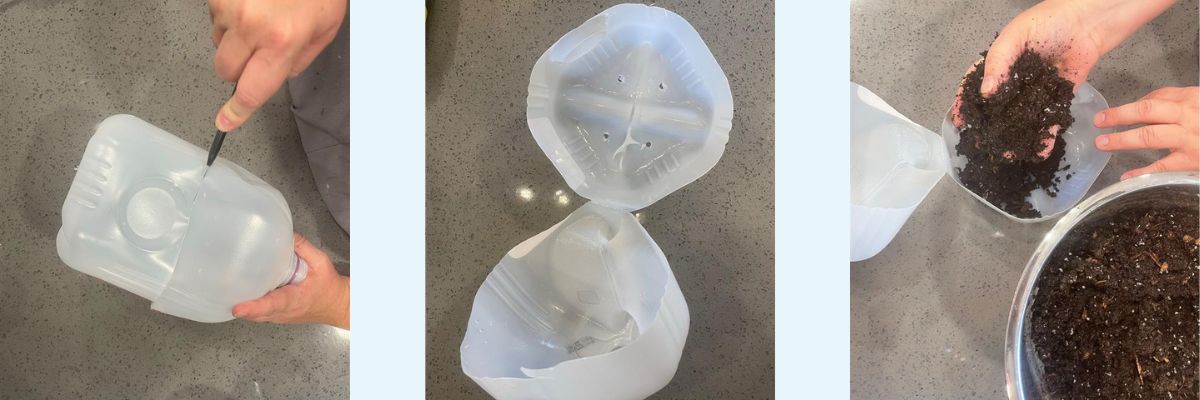
Step 1: Prepare the plastic bottle. Remove the cap from the bottle. Drill or poke four to six holes in the bottom of the bottle for drainage.

Step 2: Cut the bottle. Carefully cut the plastic bottle around its circumference, approximately 4 inches from the bottom, but do not cut all the way around. Leave about a quarter of the circumference still connected to create a hinge to easily open and close the greenhouse.
Step 3: Prepare the garden bed. Fill the bottom part of the bottle with a layer of moistened potting soil. The amount of soil you use will depend on the size of your bottle and the plants you plan to grow. Make sure there is enough soil for your seeds or small plants to grow roots.
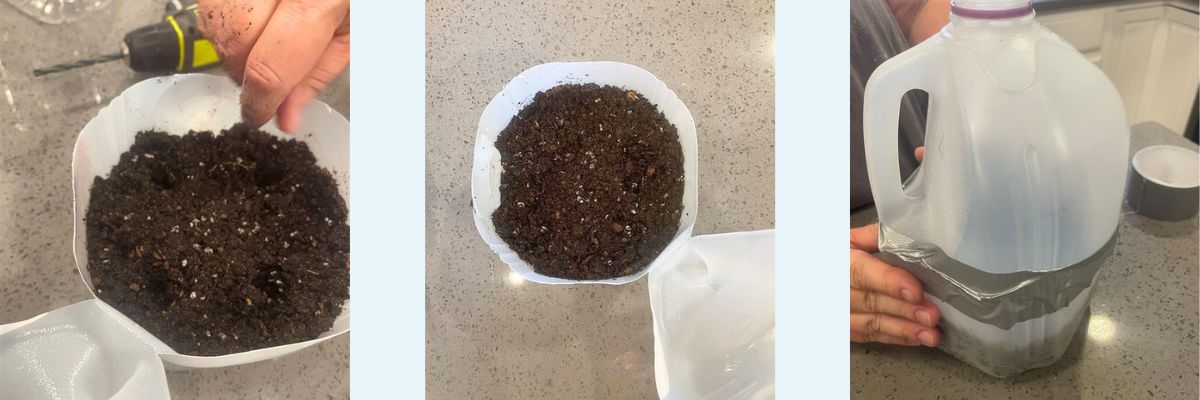
Step 4: Plant your seeds or small plants. Sow your seeds or place your small plants in the soil. Follow the instructions on the seed packet or look up specific instructions for the plants you wish to grow. You’ll likely plant about four seeds per gallon sized jug.
Step 5: Create a greenhouse effect. Place the top part of the bottle, the funnel or dome, over the soil-filled bottom to create a small greenhouse.
Step 6: Secure the greenhouse. Apply duct tape to hold the two parts firmly together. Mark the container with the type of plant inside.
Step 7: Place, water and maintain. Place your mini greenhouse in a sunny location outdoors. Water your plants as needed, ensuring the soil remains moist but not waterlogged.
Step 8: Monitor and ventilate. Use your judgment and observe the plants regularly to ensure they don’t get too hot, too humid or too cold.
Step 9: Transplant when ready. Once your plants have grown strong enough or outgrown the mini greenhouse, you can carefully transplant them into a larger container or garden bed.
This do-it-yourself mini greenhouse is a cost-effective way to protect and nurture young plants, making it an excellent choice for gardening enthusiasts or individuals with limited space. If you enjoyed this activity, check out this how-to on pollinator-friendly, native seed balls.